Well, here it is! Just as I promised. I will now give you a step-by-step tutorial on how I made the "Hello" pillow. Are you ready? Ok, here we go:
In this technique, we will be printing the "hello" graphic right onto the fabric using our computer printer. This is an easy and fabulous technique, however, you need to keep in mind that you are limited on the size of your pillow to 8.5" x 11" at the largest (unless you have one of those printers that can print larger).
First, we will prepare the fabric for printing:
Cut a piece of fabric slightly larger than 8.5" x 11"
(my piece was large enough to make two pieces to print)
I used a cotton muslin fabric.
Iron the fabric to remove the wrinkles.
(Please excuse the horridly ugly towel I used in this tutorial.
You will see in a minute why I chose to use it.)
We will now prepare the fabric to go through the printer.
We will be temporarily adhering a piece of cardstock to the fabric.
You will need some kind of a spray adhesive. I chose the Elmer's Multi Purpose Spray Adhesive.
Before you spray the adhesive onto the fabric, be sure you have something covering up the space around the fabric, or you will get the adhesive on it. (Thus the ugly towel in the pictures)
Follow the instructions on the back of the adhesive for a "temporary" stick.
For the adhesive I used, I sprayed the entire fabric with a light coat, holding the can about 4-6 inches away from the fabric. I then let the adhesive set for about 3 minutes before starting the next step. If you don't let the adhesive set for a few minutes first, the cardstock will stick too much.
Once the adhesive has set for a few minutes, place the cardstock onto the fabric and press it down firmly so that it sticks to the fabric. Again, I was making two pillows while I was doing this tutorial, so that's why there are two pieces of cardstock on my fabric. You only need one for this pillow.
Next, cut right along the edge of the cardstock along all four sides.
Once the fabric is cut to size, it is now ready for printing.
Place the fabric/cardstock combo into your printer with the fabric facing in whichever direction is required for your printer. For my printer, the fabric is facing upwards.
Pull up your graphic into your graphics program on your computer. I use the good ol' reliable Paint Shop Pro 7. I know it's a bit outdated, but I still haven't figured out the ins and outs of Photoshop, so I stick with what I know. Be sure to size your graphic according to the size of the paper as well. Remember later you will be sewing, and you need to leave at least a 1/4"-1/2" seam allowance around the edges. You may want to do a test print with a plain piece of paper to check the color and size of the graphic. You don't want to have to start over!
When you are ready to print, simply print the graphic as you normally would with your printer.
Hello gorgeous!
Now that you have the graphic printed onto the fabric, you can remove the cardstock. Simply peel the fabric from the cardstock. It should peel off very easily. (That's why you want to let the adhesive set for a few minutes before you put the cardstock on the fabric)
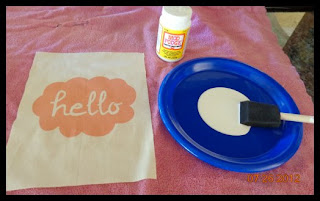
Ok, so we have the graphic printed onto the fabric, but we want to make sure it stays on the fabric. We will now put a sealer over the graphic. You can skip this step if you'd like, but I can't guarantee the longevity of the graphic on the fabric. I haven't tested the color fastness on this technique. If the pillow ever needs to be spot cleaned, I'd feel better knowing there is a sealer on the graphic.
For my sealer I used good ol' Modge Podge with a matte finish. You can use something else if you prefer. I know there are acrylic spray sealers out on the market as well.
I may try one of those on a future pillow.
Apply a light coat of sealer onto the fabric until it is completely covered.
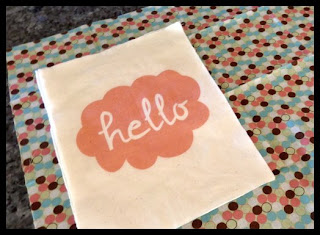
Let the sealer dry completely before going onto the next step. This picture shows the sealer on the fabric before it is dry, thus the foggy looking graphic. When the sealer dries, it will look clear. The Modge Podge does leave the fabric with a stiffer feel to it as well.
We will now prepare the fabric for sewing. I like to back my fabric with a cotton batting. It gives it more support so the stuffing doesn't make the pillow look bumpy later. I like to use Warm and Natural cotton batting, but any batting will do.
Place the "hello" fabric onto a double layer of the batting and cut around the perimeter.
You should have 2 pieces of batting.
Next, choose a coordinating fabric for the back of the pillow. You can use the same cotton muslin as the front, but my daughter liked this fabric and wanted it for the back of her pillow.
Take one of the pieces of cotton batting that you cut out and place it on the wrong side of the fabric. Cut around the perimeter of the batting.
You should now have both sides of the pillow cut and each piece should have a piece of cotton batting on the back.
Next, place the right sides together. (The batting is still on the back of both pieces)
Pin around the edges and be sure to leave an opening at the bottom for the stuffing.
Sew a 1/4"-1/2" seam around all four sides. (But don't forget to leave that opening!)
(Hey, nice table runner in the background, huh?)
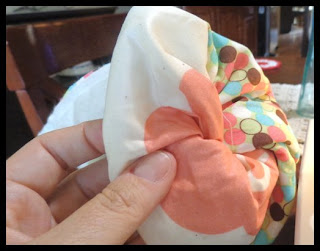
Next, turn the pillow right side out. (Don't forget to remove the pins first!)
The pillow will look a bit wrinkly after you turn it right side out, but once you stuff it, most of the wrinkles dissappear.
Stuff the pillow with a stuffing of your choice. I just use a basic polyester filling. Stuff it to your personal preference.
We're almost done!
This is how I stitch the opening closed. If you have a better technique, please use it. I'm not much of a seamstress to be honest.
And, voila! We are done!
Hello!
The possibilities are endless with this technique. I made this graphic with my Paint Shop Pro 7, but there are so many sites where you can find free graphics. These make great accent pillows, and of course are a fantastic gift idea!
Oh, wait, before you go...
A little gift:
Now you can make your own "Hello" pillow!
Have fun!
~Lori~


No comments:
Post a Comment